

How To Rip Audio Cd In Windows 10
How to rip an Sound CD in Windows 10 (4 ways)
This tutorial will evidence you step by step how to rip music from an Audio CD to your Windows x PC.
The steps on this page will show you how to copy music from your Audio CD to your reckoner's hard drive in MP3, WMA, WAV, or FLAC sound format.
Ripping an Audio CD is a good choice for bankroll up your CD music collection, listening to songs from your CD on a portable music player or mobile telephone, or recovering music from a damaged CD.
To rip an Sound CD, you'll need a CD drive and a CD ripper. A CD Ripper (besides known equally CD grabber, or CD extractor) is software that copies and converts sound tracks from an Audio CD to a computer in standard audio file formats, such every bit MP3, WMA, WAV, or FLAC.
What does ripping a CD mean?
Ripping a CD is copying the contents of a CD to a computer.
What is the all-time audio format to rip a CD?
The all-time audio format to rip an Audio CD is a lossless audio format, such as WAV, FLAC, ALAC or WMA Lossless.
Does ripping a CD touch on the CD?
Ripping a CD will not affect the CD in anyway.
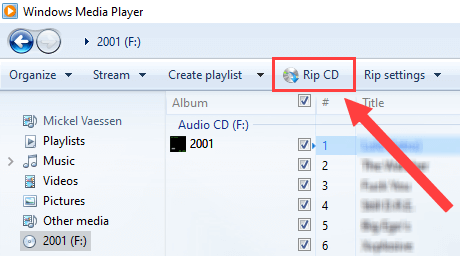
Where is the "Rip CD" button in Windows Media Player?
When there's an Audio CD in the CD drive of your estimator, the "Rip CD" button will appear in the meridian menu of Windows Media Role player (meet image below).
1. Insert the audio CD you want to rip into the CD drive of your PC.
2. Open Windows Media Player.
Three ways to open Windows Media Player in Windows ten:
- Click on the start menu button, scroll down to the letter W, click on Windows Accessories and then click on Windows Media Histrion.
- Enter WMP in the search bar (or Cortana) and then click on Windows Media Role player when it appears.
- Printing the Windows + R keys on your keyboard, enter wmplayer.exe and press Enter.
3. In the left sidebar, yous click on your CD (e.g., AlbumName (F:)).

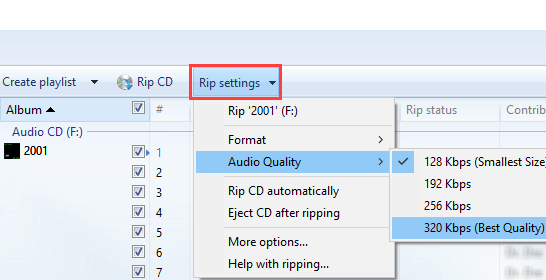
4. Click on Rip settings, go to Format and choose MP3 or another audio format, like WMA, WAV or FLAC. FLAC and WAV offer meliorate quality.

5. Click again on Rip settings, go to Sound Quality and cull 320 Kbps. Note: If you've selected the WAV or FLAC sound format, and so you don't have to select a quality setting.
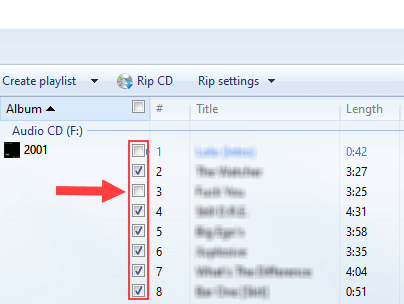
6. You can uncheck the songs you don't want to rip to your computer.
7. Click on Rip CD located next to Rip settings at the elevation.
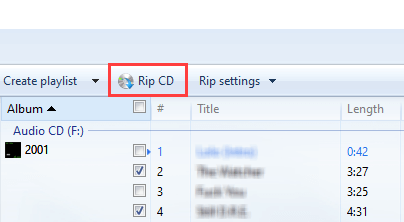
Windows Media Player will now re-create the music from your Audio CD to your computer.
Windows Media Player will save your CD in the Music folder on your PC.
How to rip an Audio CD to FLAC in Windows 10 using Exact Audio Copy (EAC)
Exact Sound Copy (EAC) is one of the best (probably the best) CD rippers available. And information technology's completely free.
You can download Exact Audio Copy from FOSSHUB, here.
First, you'll have to setup Verbal Audio Copy.
You'll but have to set it upwardly once.
Setup Exact Audio Re-create (EAC)
1. Open up Exact Sound Copy.
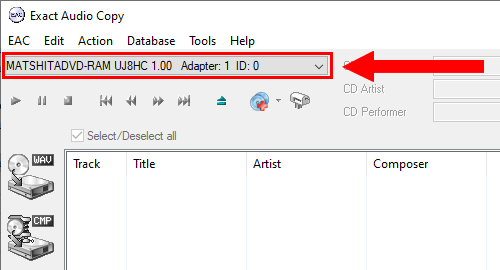
ii. Make sure the CD bulldoze of your PC is selected. Y'all can discover the drive selection menu in the summit left corner of EAC.
3. Insert the CD into the CD drive of your estimator.
4. When the "Configure AccurateRip" window appears, you click on the Configure button, and AccurateRip will configure the CD/DVD bulldoze of your calculator.
Information technology will but take a few seconds.
It volition brand the CD drive work properly with EAC.
This configuration simply needs to exist done once. Afterward, the drive volition stay configured.
AccurateRip improves Audio CD ripping by verifying ripped tracks against an Internet database, making certain they're fault-free.
You'll demand an older more than popular CD to activate the AccurateRip plugin.
Merely try to find a CD that makes the "Configure AccurateRip" window announced when you insert it into your PC.
There are a lot of CDs in the calibration database. You tin can use popular, rock, hip hop, and other classics to configure the CD/DVD bulldoze of your PC using AccurateRip.
If the "Configure AccurateRip" window does not appear, you volition need to detect a CD that makes it appear, and after the configuration, you can insert the CD y'all want to rip.
When the AccurateRip configuration is complete, a small confirmation window will appear.
5. Click on the OK push.
You will at present come across the tracks of your CD in EAC.
6. Click on EAC in the top left corner, and so click on EAC Options.
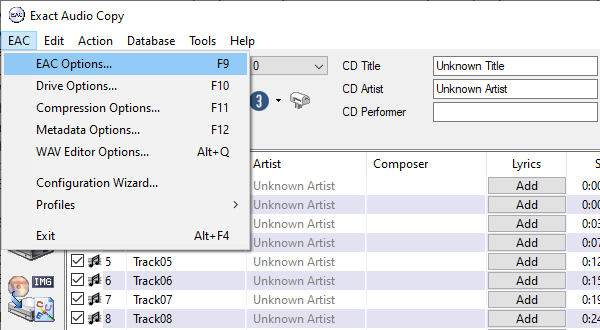
A "EAC Options" window volition appear.
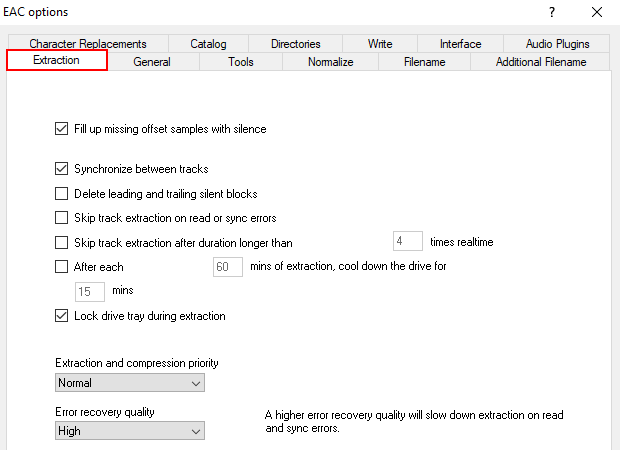
7. Click on the Extraction tab.
eight. Make certain the settings on the Extraction tab are exactly like in the epitome beneath.
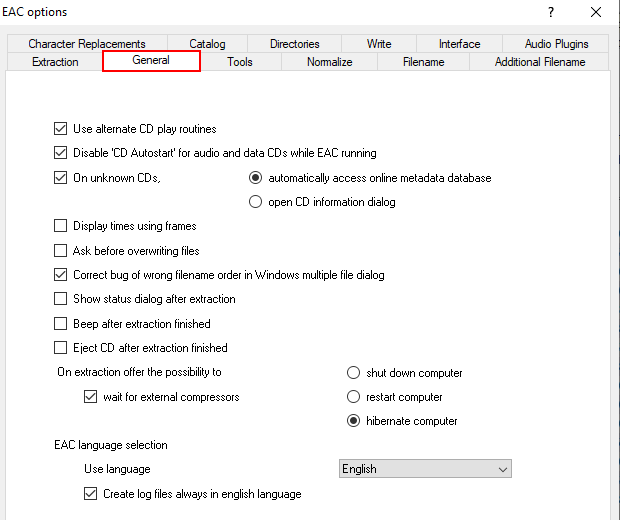
9. Click on the General tab.
ten. Brand sure the settings on the General tab are exactly like in the image below.
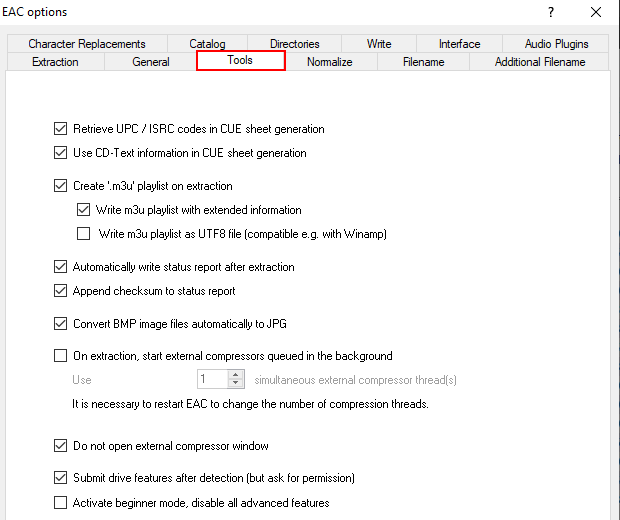
11. Click on the Tools tab.
12. Make sure the settings on the Tools tab are exactly like in the image beneath.
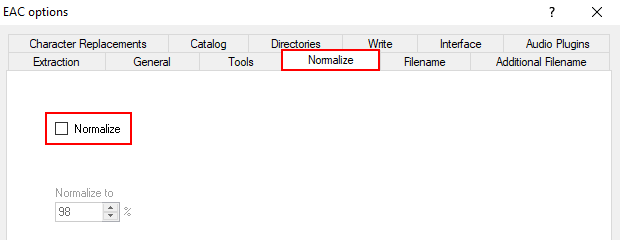
thirteen. Click on the Normalize tab.
xiv. Make sure the Normalize choice is off. This option is usually off by default.
15. Click on the Filename tab.
16. Here you volition meet various examples for filenames. Type whatever filename scheme you want into the Employ various creative person naming scheme field. See prototype beneath for an example.
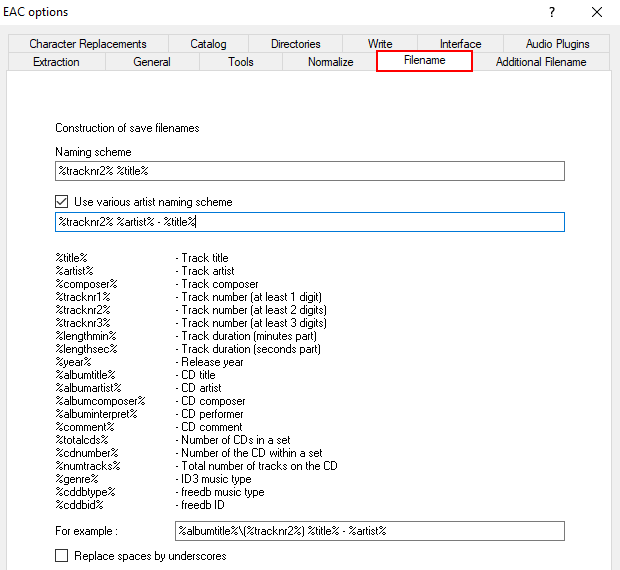
17. Make sure the Supercede spaces past underscores pick at the lesser is disabled.
eighteen. Click on the OK push button at the lesser of the settings window.
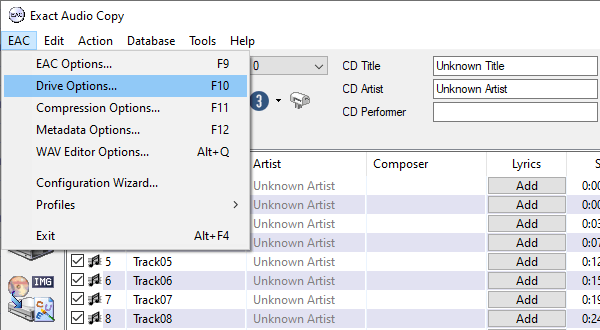
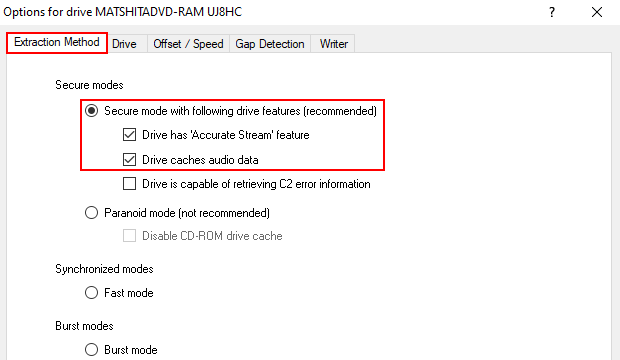
19. Click on EAC in the elevation left corner, and then click on Drive Options.
xx. If an information/alert window appears, you click on the OK button.
A "Options for drives" window will appear.
21. Click on the Extraction Method tab.
22. Enable the Secure manner with following drive features option.
23. Make sure the Drive has 'Accurate Stream' characteristic and Drive caches sound data options are enabled.
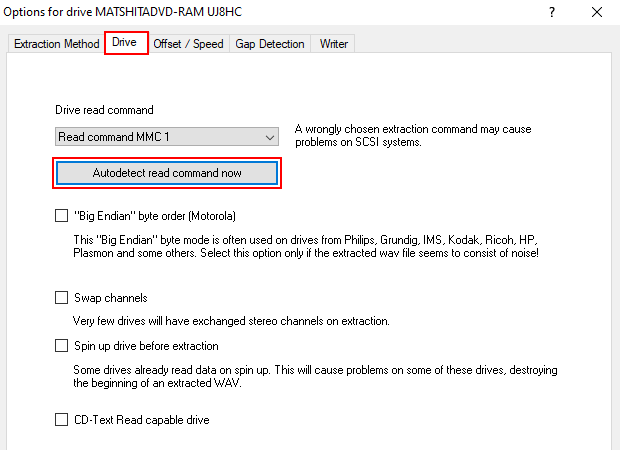
24. Click on the Drive tab.
25. Click on the Autodetect read command at present button, and wait till the read command process is complete, and a read control is selected. Your selection might look different than mine. It depends on the CD drive.
26. At that place are four more options, but you lot should only select the options if you know your CD drive supports these options. If your CD bulldoze doesn't back up the options, or y'all don't know, and then just leave the options unchecked.
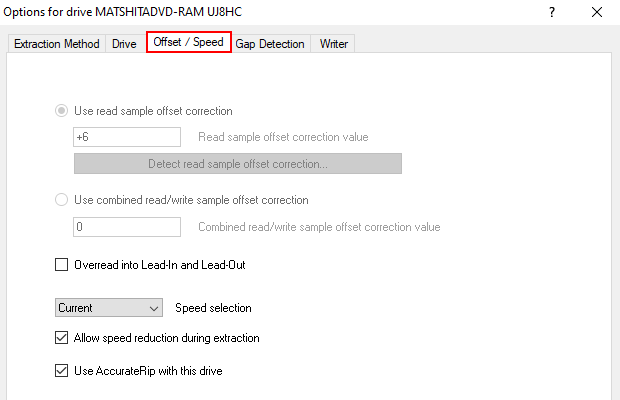
27. Click on the Offset / Speed tab.
28. Brand sure the settings on the Offset / Speed tab are exactly like in the image below.
29. Click on the Gap Detection tab.
30. At Gab/Index retrieval method, you select a method.
31. At Detection accuracy, you select either Authentic or Secure. I select Secure here.
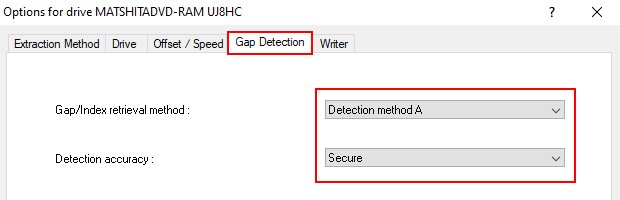
32. Click on the OK button at the bottom of the settings window.
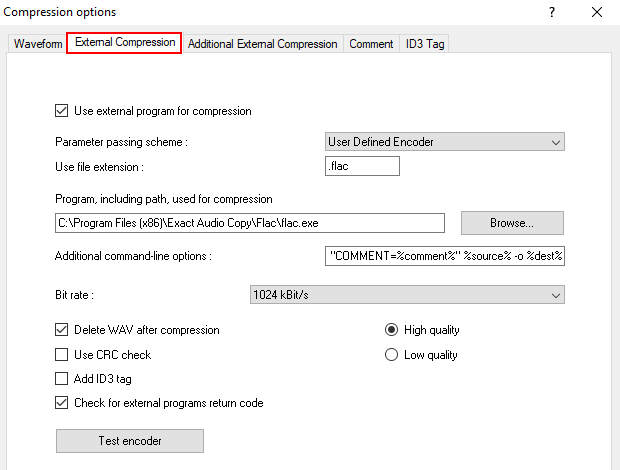
33. Click on EAC in the top left corner, so click on Compression Options.
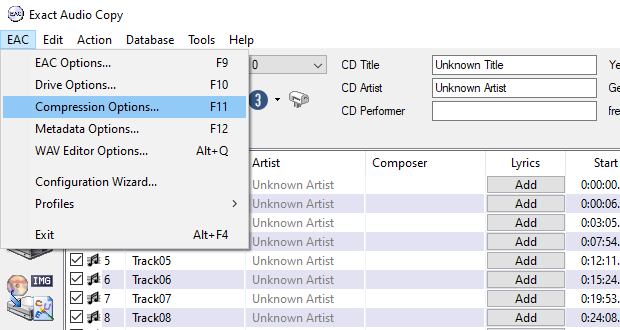
A "Pinch Options" window will appear.
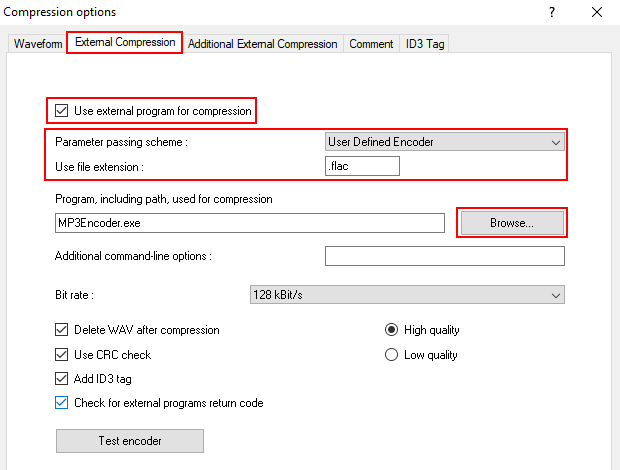
34. Click on the External Compression tab.
35. Enable the Utilize external program for compression option.
36. Select User Defined Encoder.
37. Change Utilise file extension to .flac.
38. At Programme, including path, used for compression, yous click on the Scan push.
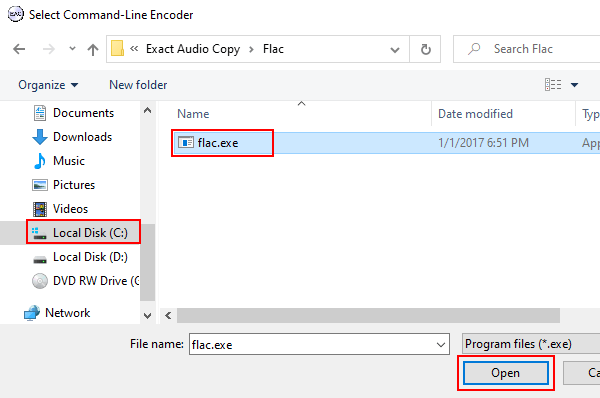
A "Select Command-Line Encoder" window will appear.
39. Within this window, you lot go to the location on your reckoner where the flac.exe file is.
Verbal Sound Re-create comes with an older FLAC encoder in C:\Program Files\Exact Audio Re-create\Flac or C:\Program Files (x86)\Verbal Audio Re-create\Flac.
Or y'all can download the latest FLAC encoder here.
40. Select the flac.exe file.
41. Click on the Open button.
42. At Boosted command-line options, you copy and paste the line below.
-8 -V -T "Creative person=%artist%" -T "TITLE=%title%" -T "Anthology=%albumtitle%" -T "Appointment=%year%" -T "TRACKNUMBER=%tracknr%" -T "GENRE=%genre%" -T "PERFORMER=%albuminterpret%" -T "COMPOSER=%composer%" %haslyrics%--tag-from-file=LYRICS="%lyricsfile%"%haslyrics% -T "ALBUMARTIST=%albumartist%" -T "DISCNUMBER=%cdnumber%" -T "TOTALDISCS=%totalcds%" -T "TOTALTRACKS=%numtracks%" -T "COMMENT=%annotate%" https://www.easytechguides.com/rip-an-audio-cd/ -o %dest%
43. At Bit charge per unit, you tin select a bitrate. Only actually, information technology doesn't do anything. So y'all can select annihilation you want here. It doesn't matter.
44. Disable the Use CRC cheque and Add ID3 tag options.
45. Enable the Check for external programs return lawmaking option.
46. Click on the ID3 Tag tab.
47. Disable all options except the last option, which is Write cover image into extraction folder.
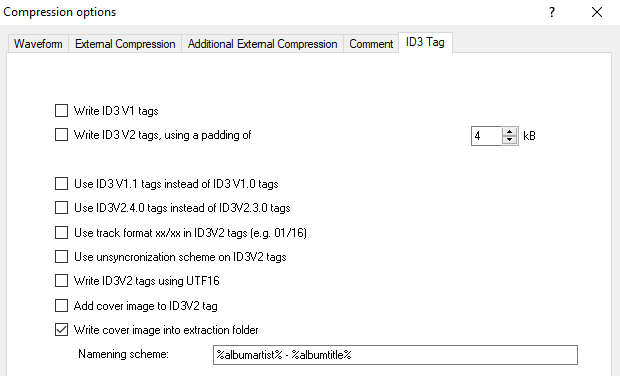
48. Click on the OK push at the lesser of the settings window.
49. Click on EAC in the top left corner, and then click on Metadata Options.
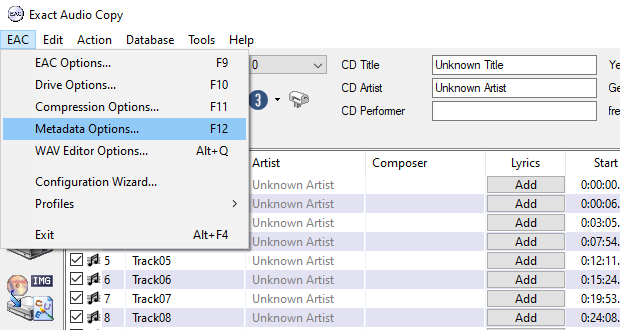
A "Metadata options" window will appear.
50. On the Metadata Provider tab, you make sure that CUE Tools DB Metadata Plugin is selected.

51. Click on the OK button at the lesser of the settings window.
EAC is setup now. You don't have to do this once more unless yous want to use EAC on some other PC.
Now it'south time to rip the CD.
Note: If Verbal Sound Copy doesn't show CD information (titles and artists), and so follow the steps below. If it does show the correct CD information, then you tin skip these steps and continue with pace sixty.
Verbal Audio Copy does not show CD information (titles and artists)
52. Click on EAC in the superlative left corner, and then click on Metadata Options.
A "Metadata options" window volition announced.
53. Click on the freedb tab.
54. Enter your email address.
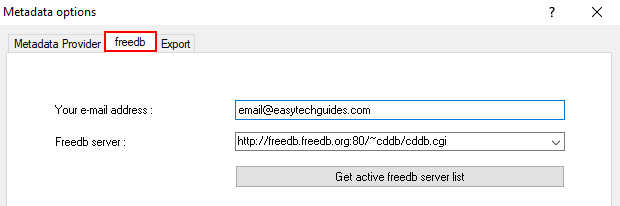
55. Click on the OK button at the bottom of the settings window.
56. Click on the Become CD Information From Metadata Provider button.
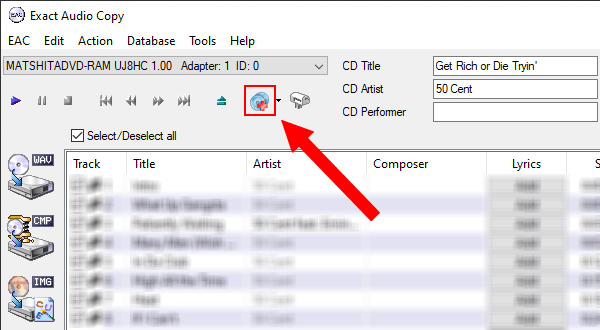
A pocket-size window with a warning message will appear.
57. Click on the Yes button.
A "Metadata Lookup" window will appear and information technology will search for metadata.
58. If your CD appears in the search results list, select it.
59. Click on the OK button.
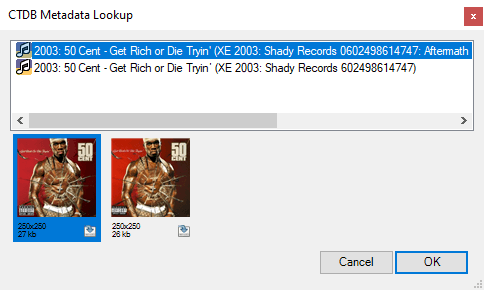
Exact Audio Copy will hopefully display the correct title(south) and artist(s).
Rip an Sound CD with Verbal Audio Copy
sixty. Click on Action in the top menu, and so click on Detect Gabs.
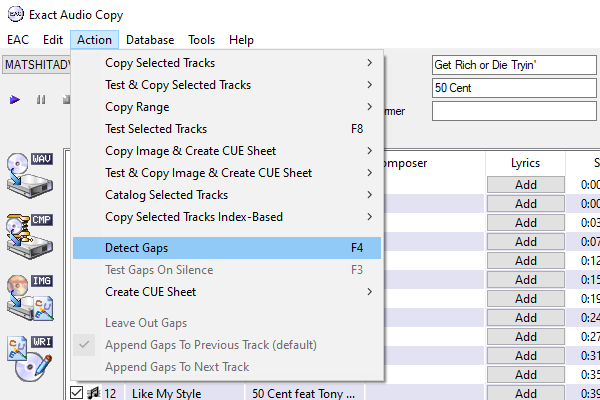
EAC volition at present analyze your CD and find gabs.
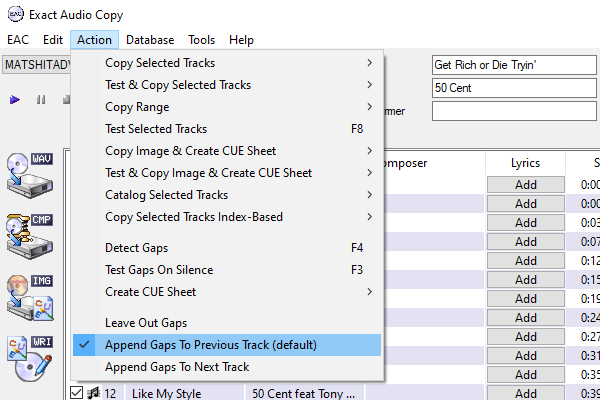
61. Click on Action in the top menu, and then click on Append Gabs To Previous Track (default).
62. Click on Action in the pinnacle bill of fare > Create CUE Sheet > Multiple WAV Files With Gabs...(Noncompliant).
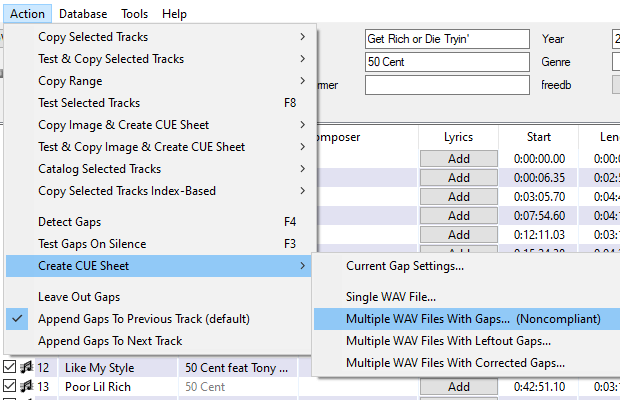
A "Salvage CUE Sheet" window volition appear.
63. Select a location on your calculator where you want to save the file.
64. Click on the Save push.

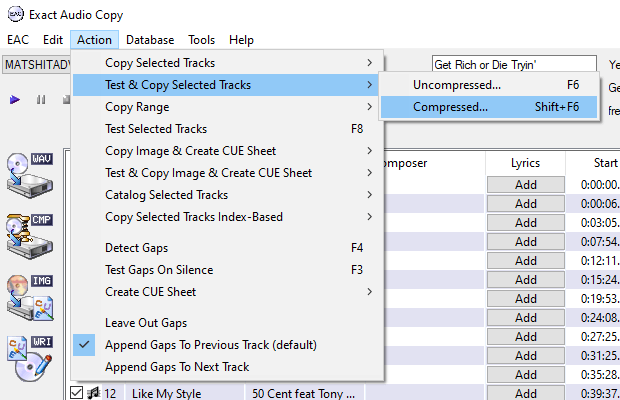
65. Once the CUE sheet is created, you click again on Action > Test & Copy Selected Tracks > Compressed.
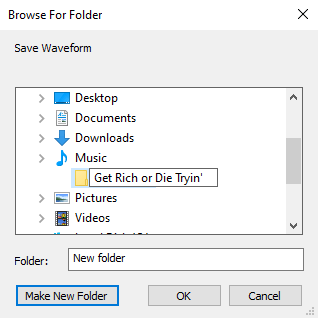
A "Scan For Folder" window will appear.
66. Select a location on your computer where you want to save the CD. You also have the choice to create a new folder.
67. Click on the OK push.
Verbal Audio Copy will now re-create the music from your Audio CD to your figurer.
This may take a while.
The time it takes depends on the CD, CD drive, and your PC's hardware.
How to rip an Audio CD in Windows 10 using fre:air-conditioning
fre:ac is another popular free CD ripper.
You tin download fre:ac from the Microsoft Shop, or yous tin download it from their website, here.
1. Open fre:ac.
2. Insert the CD into the CD drive of your computer.
fre:air-conditioning volition now retrieve data from the CD, and after that, it will prove the tracks of your CD.
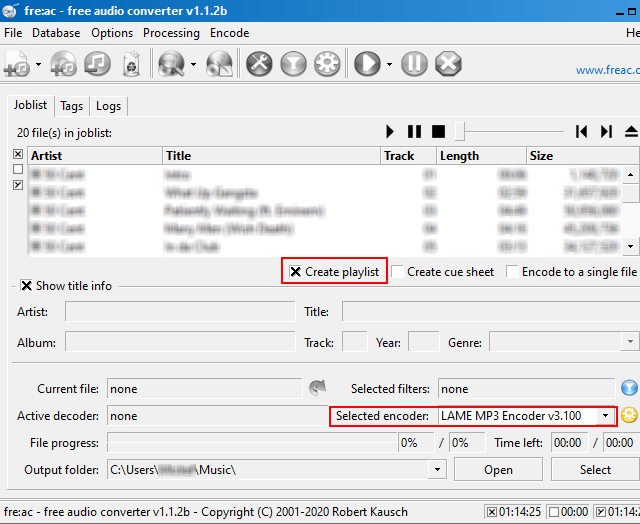
iii. Enable the Create playlist selection.
4. At Selected encoder, you lot select FLAC Audio Encoder, LAME MP3 Encoder, or another audio format.
The WAV and FLAC audio formats offer the best quality, but the file size of the tracks will be much larger than MP3 files. I would select FLAC for high quality or MP3 if your device doesn't back up FLAC or when disk space is a problem.
5. If you select MP3, then click on the settings button in the meridian toolbar or click on the settings button next to the selected LAME MP3 Encoder pick. But if yous select WAV or FLAC, and so you tin skip the following steps and continue with step 10.
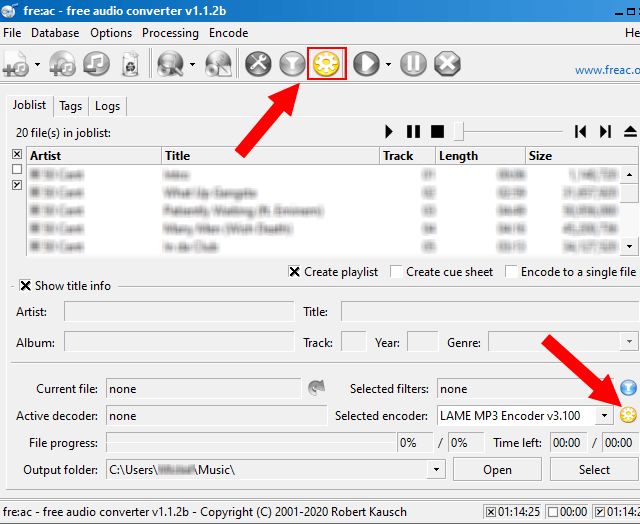
A "LAME MP3 Encoder" window will announced.
6. At Use preset, you select Custom settings.
7. In the VBR way section, you lot select the CBR option.
eight. Set bitrate to 320 kbps.

9. Click on the OK button at the bottom of the settings window.
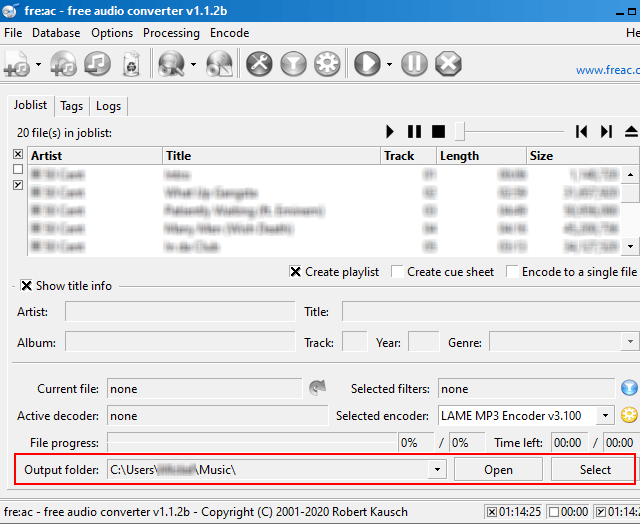
10. At Output folder located at the lesser, you can see and change the location on your computer where fre:ac will salve the CD. You lot tin change this location past clicking on the Select push.
11. When you're gear up, you click on the showtime button.
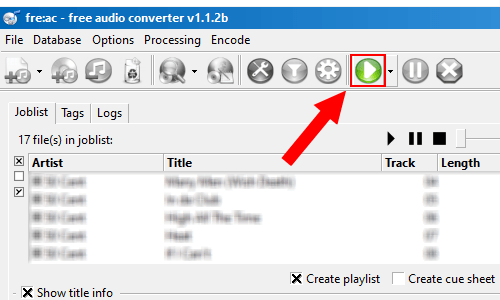
Or yous click on Encode located in the pinnacle menu, and so click on Get-go encoding.
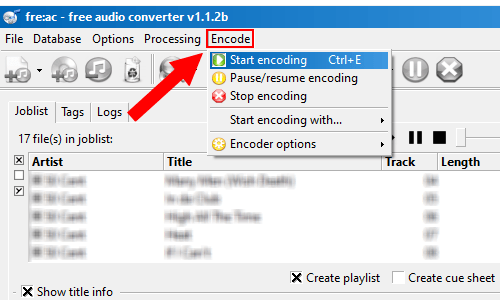
fre:air-conditioning will now copy the music from your Audio CD to your computer.
How to rip an Audio CD in Windows ten using VLC
You lot can download VLC media thespian from the Microsoft Store, or you tin can download it from their website, here.
Annotation: VLC doesn't allow yous to rip multiple CD tracks at once.
1. Open VLC.
ii. Insert the CD into the CD drive of your calculator.
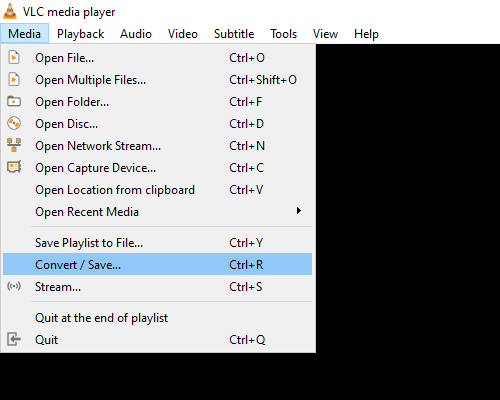
3. Click on Media in the tiptop left corner, and then click on Catechumen / Salve.
A "Open Media" window will appear.
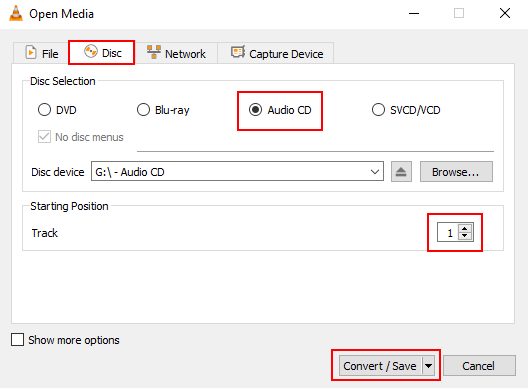
4. Within this window, you click on the Disc tab.
v. Select Audio CD.
6. At Track, y'all select the rail you want to save to your estimator.
seven. Click on the Convert / Salvage push at the bottom of the window.
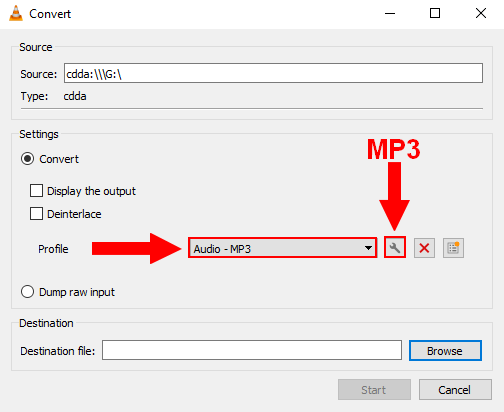
A "Catechumen" Window will appear.
8. Within this window, at Profile, you select Audio - CD (WAV), Sound - FLAC, or Audio - MP3.
The WAV and FLAC sound formats offering the all-time quality, but the file size of the tracks will be much larger than MP3 files. I would select FLAC for high quality or MP3 if your device doesn't support FLAC or when disk infinite is a problem.
nine. If yous select MP3, then click on the ![]() (wrench/tool) push next to the profile selection menu. Only if you select WAV or FLAC, so yous tin skip the following steps and continue with step 13.
(wrench/tool) push next to the profile selection menu. Only if you select WAV or FLAC, so yous tin skip the following steps and continue with step 13.
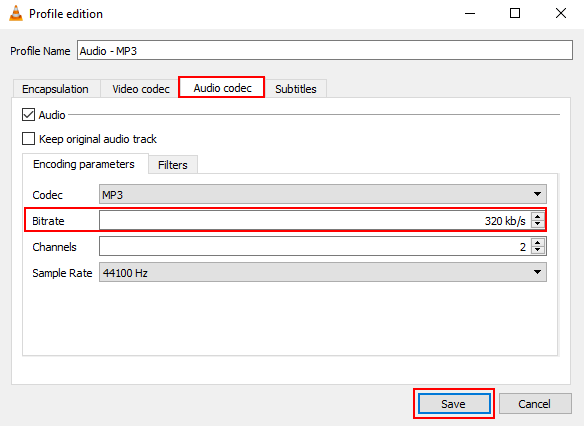
A "Profile edition" window will appear.
x. Click on the Audio codec tab.
11. At Bitrate, you lot select or type 320 kb/s.
12. Click on the Save button.
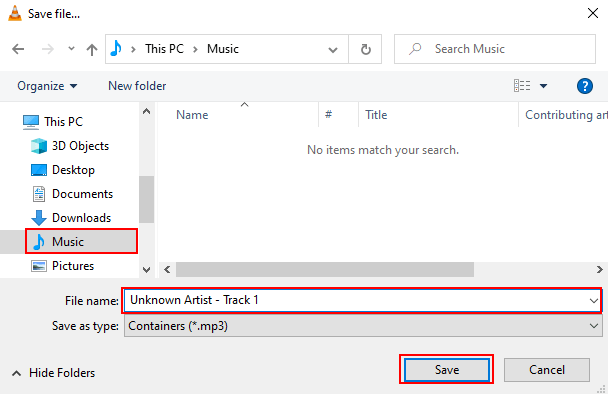
13. Click on the Browse push button.
A "Save file" window will appear.
xiv. Select a location on your computer where you want to save the track.
15. In the File name field, you enter the proper name of the track.
16. Click on the Salve push.
17. When yous're ready, you click on the Start button.
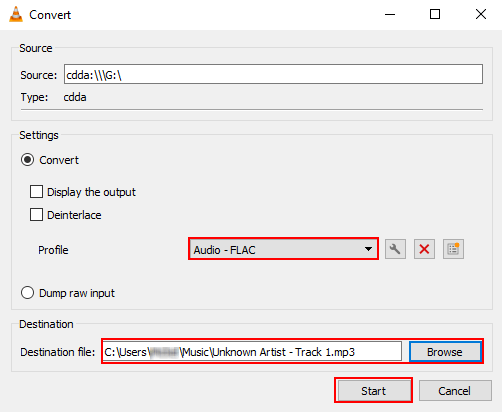
VLC will now copy the sound track from your Sound CD to your computer.
Perchance you're also interested in:
How to rip a DVD
How to rip an Audio CD in Linux
References:
ExactAudioCopy.de: AccurateRip
AccurateRip.com
Hydrogenaud.io: EAC and FLAC
YouTube: EAC V1.3/iv/5 | Guide to perfect CD rips & log files
Source: https://www.easytechguides.com/rip-an-audio-cd/
Posted by: dicarlothendre.blogspot.com
0 Response to "How To Rip Audio Cd In Windows 10"
Post a Comment